Saturday, March 14, 2015

Upgrade vCenter 5.5 to 6.0

This week VMware released vSphere 6.0 and vCenter 6.0 in which one of the big news i a much faster and responsive web client.
The install process of vCenter 6.0 is not completely obvious as its not an OVA-file to deploy so I decided to write this quick guide on how to upgrade vCenter 5.5 to 6.0

1. Download the ISO

go to the vmware download page (https://my.vmware.com/web/vmware/details?downloadGroup=VC600&productId=491&rPId=7501) and fetch the ISO file called VMware vCenter Server Appliance and download it to your computer.

2. Mount/Extract the ISO

Next step is to mount the ISO. If you are running Windows 8 you can just right click it and chose "mount" to have it mounted to a virtual cd-drive. Else you can use WinRAR or 7zip to extract the files from the ISO.

3. Upgrade the VMware Client Integration Plugin

On the ISO, find the folder named "vcsa" and inside it you find an installer for upgrading the VMware browser plugin on your computer to 6.0. Remember to close all open browsers first, then run the installer.

4. Start the upgrade

When the browser plugin is upgraded go back to the ISO, in the root you find a file called vcsa-setup.html, open it with your browser and chose "Upgrade".
Accept the EULA and countine.
The first info the installer needs is the target server and credentials. Note that this is the target ESXi-host for where you want to install your vCenter 6.0 VM, NOT your current vcenter server.

5. Source Appliance

The next step is to chose a name for you new vcenter server and then go ahead and enter all the login info for your old vcenter server and the esxi-host that it is currently deployed on.
When you have entered all the login details you will have to chose the size of your vcenter installation (how many hosts and VMs it should be able to manage) and what datastore to put it in.
The last step will be to assign an IP address to the new vcenter installation from which it can reach your old vcenter. Note that this address will only be used temporary, as soon as the install is complete your old vcenter will be deleted and the new install will start using the same address as your old install.

This was the last step, now your upgrade will begin, this process takes a fairly long time, atleast 15min+ so have patience.
As soon as the upgrade is complete you then can go ahead and login to your new vcenter 6.0 via the new fast web client.
Hope you had some help from this guide.

Thursday, October 23, 2014

Using rrdcached with Observium

rrdcached is a daemon that receives updates to existing RRD files, accumulates them and, if enough have been received or a defined time has passed, writes the updates to the RRD file.
This can be very useful in a bigger Observium-instance as the number of polled interfaces grow and the number of RRD-files that will be updated each polling is increasing, soon each polling will be generating a lot of random writes to your storage.
rrdcached gives us the possibility to trade some of that IO for memory. This is can be very good deal for virtual machines or any server with a slower storage but a fair amount of memory.

This small guide is written and tested on Ubuntu Linux and I cant guarantee that it will work on any other distro.

1. Start by installing rrdcached using your favorite packet manager
#  sudo apt-get update && sudo apt-get install rrdcached

2. The rrdcached daemon will be started automatically so we need to stop it.
# sudo service rrdcached stop
Stopping RRDtool data caching daemon: rrdcached.

3. Edit the start up options for the rrdcached daemon
# sudo nano /etc/default/rrdcached

Find the row in the configfile with #OPTS= and replace them with these options:
OPTS="-w 1800 -z 1800 -f 3600 -s www-data -l unix:/var/run/rrdcached.sock -j /var/lib/rrdcached/journal/ -F -b /opt/observium/rrd/ -B"
Dont forget to remove the bracket!

The values used here defines the following:

  • -w 1800 Wait 1800s (30min) before writing data
  • -z 1800 Delay writes by a random factor of up to 30 minutes (this should be equal to, or lower than, “-w”)
  • -f 3600 Flush all data every 3600s (1 hour)
  • -s set the group owner of the socket to www-data (this needs to be set before -l)
  • -l path to our socket that observium will talk to
  • -j path to journaling files
  • -F ALWAYS flush all updates to the RRD data files when the daemon is shut down
  • -b path to observium RRD-files
  • -B Only permit writes into the base directory specified in -b (and any sub-directories).
4. Now start rrdcached daemon again
# sudo service rrdcached start
5.  Now here comes the big problem, as rrdached is started as root it will create the socket-file (/var/run/rrdcached.sock) with root permissions. But the webserver user need to be able to both read and write to this socket so we will need to change the owner to the webserver user (www-data in this case)
# sudo chown www-data:www-data /var/run/rrdcached.sock
This needs to be redone every time rrdcached is restarted as it will then recreate this file.
This probably can be solved by manipulating the init-script or some other cleaver way, suggestions are highly appreciated! There are also flags in rrdcached for this (-m and -s) but I never got it to work, file owner was always root.
*NOTE* Step 5 no longer needed when using -s flag properly!

6. Last step, edit the observium config.php to use our rrdcached socket instead of writing RRDs directly.
# sudo nano /opt/observium/config.php
Then add this line to the config
 $config['rrdcached']    = "unix:/var/run/rrdcached.sock";
Save and exit! Now log in to Observium, your graphs should look as they use to. If you have a pretty big instance you should soon notice that the storage IO has decreased by a lot.

If all your graphs show "draw error" then you webserver user probably dont have read and write-access to /var/run/rrdcached.sock

This is the IO of my observium-machine after installing rrdcached:

Weathermap

if you are using the php-weathermap with Observium then you will also need to edit the weathermap file to inclued:
putenv ("RRDCACHED_ADDRESS=/var/run/rrdcached.sock");

Tuesday, July 15, 2014

Using PHP Weathermap with Observium

The PHP Weathermap plugin is a very popular tool for mapping the link load of a network environment. It is usually used as a plugin to Cacti or MRTG but as Observium is gaining popularity I decided to make a quick guide for how you get the weathermap nicely integrated with Observium in a way that does not break when updating to newer versions of Observium.

This guide assumes that you have a working installation of Observium already, preferably a installation that was done using the Debian/Ubuntu-guide.

1. Download the modified version of PHP Weathermap from github github: https://github.com/ZerxXxes/weathermap-for-observium and put it in your observium/html-directory.
The easiest way to do this is using git:
cd /opt/observium/html/
git clone https://github.com/ZerxXxes/weathermap-for-observium.git weathermap
2. If you have used different paths for observium or the weathermap-plugin you will need to edit the variables in data-pick.php and map-poller.php, if you are following the installation guide then the default variables will work.

3. open the file editor.php and change the value in the beginning to:
 $ENABLED=true
As long as this value is true everyone who knows the right URL will be able to access the weathermap editor, its therefore recommended to change this value back to false as soon as you are done editing.

4. Make sure the directory configs/ is writable by your webserver, one way is to change to owner of the directory to the webserver-user: (in Ubuntu the webserver user is usually called www-data)
cd weathermap/
chown www-data:www-data configs/
5. Create a new directory called maps/ and make the webserver-user the owner
mkdir maps/
chown www-data:www-data maps/
6. Now use your webbrowser and access the editor in weathermap/editor.php (i.e. surf to observium.myurl.com/weathermap/editor.php)

7. Create a new map by writing a name and click create map. Note that the map name *must* end with .conf (i.e. networkmap.conf)
Edit your map, create nodes and draw links and then pick graphs from Observium to use with the links.
*NOTE* Under Map Properties, make sure to define Output HTML Filename to maps/<mapname>.html and Output Image Filename to <mapname>.png


8. Make the file map-poller.php executable for your system by doing:
chmod +x map-poller.php
9. Add a new line in the cronjob at /etc/cron.d/observium after the Observium polling and discovery:
*/5 * * * * root /opt/observium/html/weathermap/map-poller.php >> /dev/null 2>&1
10. Move the file navbar-custom.inc.php in the observium/html/includes/-directory. This file does not exist by default in Observium but Observium looks for this file and include the code from it if it exists, this makes it possible to add custom menus that does not break when you upgrade you Observium installation.
mv navbar-custom.inc.php /opt/observium/html/includes/navbar-custom.inc.php
*NOTE*
 If you are using the current community edition (based on revision 5229) or any revision older than 5670 you should instead use the file navbar-custom-old.inc.php and rename it.


Now that's it!
All .html-files in the maps/-directory will be linked in a sub menu in the Observium GUI like this:


Clicking on one of them will take you to the rendered weathermap where you will get a nice overview of your networks load.
Hovering the mouse over a link will show the Observium graph for that link like this:


And clicking on a link will take you to the Observium-page for that link.

Hope this guide has been helpful for you and thank you for reading!

Tuesday, August 6, 2013

How to change IP address in linux

There are many ways to change your IP address in linux.
Start by finding the current ip address by typing
ifconfig
or in some cases
/sbin/ifconfig

The output should be something like this:
eth0      Link encap:Ethernet  HWaddr 00:0c:29:e8:23:ba
             inet addr:192.168.114.3  Bcast:192.168.114.255  Mask:255.255.255.0
             inet6 addr: fe80::20c:29ff:fee8:23ba/64 Scope:Link
             UP BROADCAST RUNNING MULTICAST  MTU:1500  Metric:1
             RX packets:307505062 errors:0 dropped:2743 overruns:0 frame:0

in this case 192.168.114.3 is my IP address.
Now I want to change my address to the static IP address 192.168.1.3
This is easily done with this command:
ifconfig eth0 192.168.1.3 netmask 255.255.255.0 up

My IP address is now changed to the static ip 192.168.1.3

Persistant static IP address

Changing the IP address with ifconfig will only make the computer keep that address until a reboot.
To make your static IP address static you will need to change the config file for the network interface.
Edit this file with your favorite editor: /etc/network/interfaces

auto eth0
iface eth0 inet static
        address  192.168.1.3
        netmask 255.255.255.0
        gateway  192.168.1.1

The above lines in the config file will make the network interface use the static IP address 192.168.1.3 and use 192.168.1.1 as gateway.
After changing this file you will need to restart the network service, this can usually be done by the command:
service networking restart
as root or by just rebooting your computer.


Monday, July 29, 2013

How do i find out my ip

Finding out what IP address your computer uses could be useful in many cases.
Here is a quick guide for how we can find the IP address in different operating systems.

Windows

In pretty much every version of windows we can find the IP address easily using the command tool. Start buy pressing the windows key and R at the same time, then write 'cmd' and press enter.
You should now see a black box, here write 'ipconfig' and press enter.
A chunk of text will appear. Scroll upwards until you see the line:
IPv4-adress . . . . . . . . . . . :
The number followed that line is your computers IP address.


Mac / OSX

On the Mac you find the IP address by starting up the program called Terminal and in the black box you write 'ifconfig' and press enter.
Now look for the line saying 'inet'
The number followed that line is your computers IP address.

Linux

Finding the ip address in linux is as easy as on the Mac, in the terminal you only need to write 'ifconfig' or on some distros you might need to write '/sbin/ifconfig' and press enter.
Look for the line 'inet addr:'
The number on that line will be the ip address of your linux-machine.

Friday, November 23, 2012

Cisco ACE Configuration Example

The Cisco Application Control Engine (ACE) is a device for doing server loadbalancing, distributing to load of a service to multiple hosts.
Here is a short example configuration for loadbalancing on two servers running a webserver.

First we configure the addresses to the realservers, this is the actual servers that will process the requests.

host1/Admin(config)# rserver SERVER1
host1/Admin(config-rserver-host)# ip address 192.168.12.1
host1/Admin(config-rserver-host)# inservice
host1/Admin(config)# rserver SERVER2
host1/Admin(config-rserver-host)# inservice
host1/Admin(config-rserver-host)# ip address 192.168.12.2

Second we will configure a probe that the loadbalancer will use to verify that the realservers are operational, we will make the loadbalancer probe port 80 to verify that the webpage is reachable.

host1/Admin(config)# probe http WEBPROBE
host1/Admin(config-probe-http)# expect status 200 200

Next we are creating a serverfarm with our two servers that will handle this service and make it use the probe we created.

host1/Admin(config)# serverfarm SERVERFARM-WEBSERVERS
host1/Admin(config-sfarm-host)# probe WEBPROBE
host1/Admin(config-sfarm-host)# rserver SERVER1
host1/Admin(config-sfarm-host-rs)# inservice
host1/Admin(config-sfarm-host)# rserver SERVER2
host1/Admin(config-sfarm-host-rs)# inservice

Now we create a class-map with the virtual IP that will front the webservers.
We tie it to the correct class and put it inservice and allow the VIP to reply to ping.

host1/Admin(config)# class-map match-all WEB-CLASS
host1/Admin(config-cmap)# match virtual-address 192.168.1.1 tcp eq www

host1/Admin(config)# policy-map type loadbalance first-match WEB-POLICY
host1/Admin(config-pmap-lb)# class class-default
host1/Admin(config-pmap-lb-c)# serverfarm SERVERFARM-WEBSERVERS

host1/Admin(config)# policy-map multi-match INCOMING-POLICY
host1/Admin(config-pmap)# class WEB-CLASS
host1/Admin(config-pmap-c)# loadbalance vip inservice
host1/Admin(config-pmap-c)# loadbalance policy WEB-POLICY
host1/Admin(config-pmap-c)# loadbalance vip icmp-reply active

Last thing to do is to apply the policy to the interface on the loadbalancer that recives the incoming traffic.

host1/Admin(config)# interface vlan 120
host1/Admin(config-if)# service-policy input INCOMING-POLICY

Thats all that you need.
We now have a probe trying to connect to port 80 on the two servers, as soon as the servers are starting to reply to the http requests with code 200 (OK) then the loadbalancer will put the VIP online and start relaying all incoming traffic on interface vlan 120 towards the VIP to the both realservers using round-robin.
  

Tuesday, August 21, 2012

How to install Windows 7 from USB

Prepare a ISO-file

To install Windows 7 from an USB  memory you will first need the Windows installation DVD as an ISO-file. If you downloaded the Windows DVD from a website like for example MSDNAA you probably already have it as an ISO-file. The file will have a little grey CD as icon and if you can see the filename extension it should end with ".ISO".
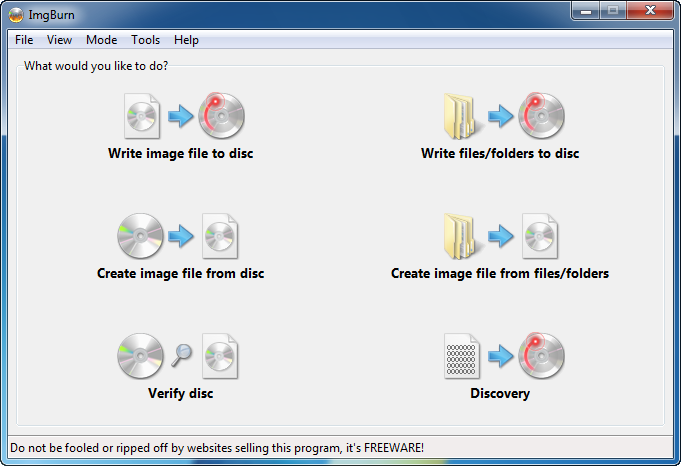
If you have your Windows installation as a DVD you need to save it to your computer as an iso-file first. This can be easily done with a tool like ImgBurn. Just download and install this tool for free and then you simply select "Create Image file from disc" as seen here:
Then you save the file to a destination of your choosing and can now start to prepare it for the USB-stick.
The USB-stick needs to be at least 4GB and you should know that all the files on it will be removed so be sure to copy all the files you want to save to something else then put the memorystick in your computer.

Use the Windows 7 USB/DVD download tool

The next thing you need is the Windows 7 USB/DVD download tool which can be downloaded directly from Microsoft here.
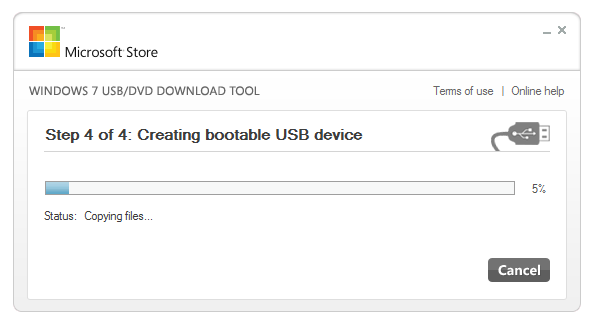
 Install the tool and start it, in the first screen you will be asked to choose your iso-file. Click browse and choose the file you preaperde and click open, then click Next.

In the next screen you are asked if you want to make an installation DVD or USB, choose USB.
The next screen will ask you for which drive you want to but the Windows installation in, choose the USB you have in your computer and hit next, you will get a warning that all data on the USB will be deleted, click OK. The Windows installation files will now be transferred to the USB-stick.

Boot your computer from USB

When the file transfer is complete take the USB-stick and put it in the computer you want to install.
If the computer have a boot-menu you can enter that to choose to boot from the USB, when you turn the computer on, look for something about "Multiboot" or anything with the word boot followed by a F-button. Usually its F12 but can be other buttons to depending on the motherboard. Press F12 and you should see a menu that looks something like this:
Choose Removable Device or maybe USB-device or something similar and press enter. The Windows 7 installation will now start.
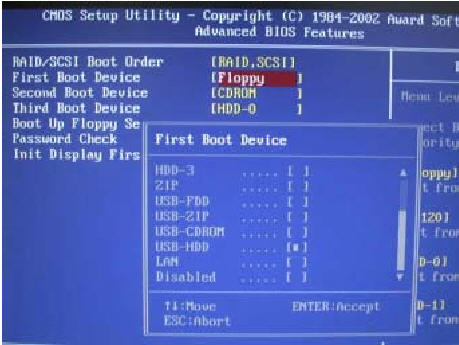
If your motherboard don't have a bootmenu you will need to enter BIOS to chose USB as your primary boot device. Turn your computer on and enter BIOS by pressing F2, F8 or DEL depending on your motherboard (you will see a message telling you which button to use directly when you start your computer)
In BIOS, find the boot menu and change the primary boot device to USB-HDD or Removable device or something similar by pressing + until its at the top. It should now look something like this.
Press enter and chose Save and Exit. Your computer should now reboot and will then start the installation from the USB-stick.