The Cisco Application Control Engine (ACE) is a device for doing server loadbalancing, distributing to load of a service to multiple hosts.
Here is a short example configuration for loadbalancing on two servers running a webserver.
First we configure the addresses to the realservers, this is the actual servers that will process the requests.
host1/Admin(config)# rserver SERVER1
host1/Admin(config-rserver-host)# ip address 192.168.12.1
host1/Admin(config-rserver-host)# inservice
host1/Admin(config)# rserver SERVER2
host1/Admin(config-rserver-host)# inservice
host1/Admin(config-rserver-host)# ip address 192.168.12.2
Second we will configure a probe that the loadbalancer will use to verify that the realservers are operational, we will make the loadbalancer probe port 80 to verify that the webpage is reachable.
host1/Admin(config)# probe http WEBPROBE
host1/Admin(config-probe-http)# expect status 200 200
Next we are creating a serverfarm with our two servers that will handle this service and make it use the probe we created.
host1/Admin(config)# serverfarm SERVERFARM-WEBSERVERS
host1/Admin(config-sfarm-host)# probe WEBPROBE
host1/Admin(config-sfarm-host)# rserver SERVER1
host1/Admin(config-sfarm-host-rs)# inservice
host1/Admin(config-sfarm-host)# rserver SERVER2
host1/Admin(config-sfarm-host-rs)# inservice
Now we create a class-map with the virtual IP that will front the webservers.
We tie it to the correct class and put it inservice and allow the VIP to reply to ping.
host1/Admin(config)# class-map match-all WEB-CLASS
host1/Admin(config-cmap)# match virtual-address 192.168.1.1 tcp eq www
host1/Admin(config)# policy-map type loadbalance first-match WEB-POLICY
host1/Admin(config-pmap-lb)# class class-default
host1/Admin(config-pmap-lb-c)# serverfarm SERVERFARM-WEBSERVERS
host1/Admin(config)# policy-map multi-match INCOMING-POLICY
host1/Admin(config-pmap)# class WEB-CLASS
host1/Admin(config-pmap-c)# loadbalance vip inservice
host1/Admin(config-pmap-c)# loadbalance policy WEB-POLICY
host1/Admin(config-pmap-c)# loadbalance vip icmp-reply active
Last thing to do is to apply the policy to the interface on the loadbalancer that recives the incoming traffic.
host1/Admin(config)# interface vlan 120
host1/Admin(config-if)# service-policy input INCOMING-POLICY
Thats all that you need.
We now have a probe trying to connect to port 80 on the two servers, as soon as the servers are starting to reply to the http requests with code 200 (OK) then the loadbalancer will put the VIP online and start relaying all incoming traffic on interface vlan 120 towards the VIP to the both realservers using round-robin.
Friday, November 23, 2012
Tuesday, August 21, 2012
How to install Windows 7 from USB
Prepare a ISO-file
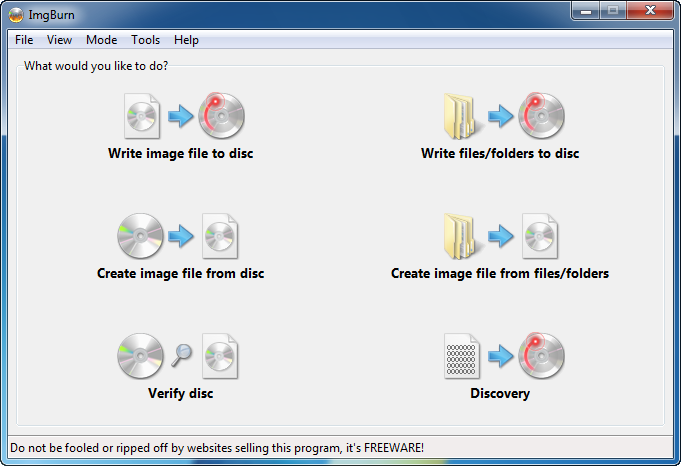
To install Windows 7 from an USB memory you will first need the Windows installation DVD as an ISO-file. If you downloaded the Windows DVD from a website like for example MSDNAA you probably already have it as an ISO-file. The file will have a little grey CD as icon and if you can see the filename extension it should end with ".ISO".If you have your Windows installation as a DVD you need to save it to your computer as an iso-file first. This can be easily done with a tool like ImgBurn. Just download and install this tool for free and then you simply select "Create Image file from disc" as seen here:
The USB-stick needs to be at least 4GB and you should know that all the files on it will be removed so be sure to copy all the files you want to save to something else then put the memorystick in your computer.
Use the Windows 7 USB/DVD download tool
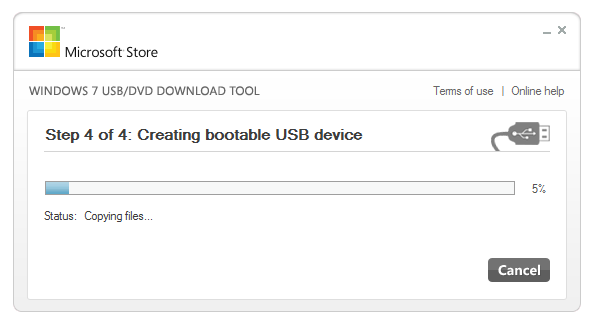
The next thing you need is the Windows 7 USB/DVD download tool which can be downloaded directly from Microsoft here.Install the tool and start it, in the first screen you will be asked to choose your iso-file. Click browse and choose the file you preaperde and click open, then click Next.

In the next screen you are asked if you want to make an installation DVD or USB, choose USB.
The next screen will ask you for which drive you want to but the Windows installation in, choose the USB you have in your computer and hit next, you will get a warning that all data on the USB will be deleted, click OK. The Windows installation files will now be transferred to the USB-stick.
Boot your computer from USB
When the file transfer is complete take the USB-stick and put it in the computer you want to install.If the computer have a boot-menu you can enter that to choose to boot from the USB, when you turn the computer on, look for something about "Multiboot" or anything with the word boot followed by a F-button. Usually its F12 but can be other buttons to depending on the motherboard. Press F12 and you should see a menu that looks something like this:

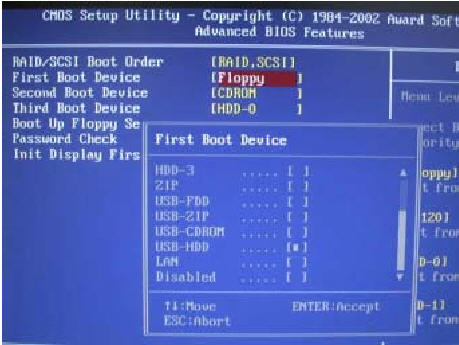
If your motherboard don't have a bootmenu you will need to enter BIOS to chose USB as your primary boot device. Turn your computer on and enter BIOS by pressing F2, F8 or DEL depending on your motherboard (you will see a message telling you which button to use directly when you start your computer)
In BIOS, find the boot menu and change the primary boot device to USB-HDD or Removable device or something similar by pressing + until its at the top. It should now look something like this.

Saturday, July 21, 2012
How to set up a secure wireless network
The first thing to consider is that a wireless network is never safe. The
fact that all data is sent out in a large radius to anyone who felt
like listening means that you never should have some sort of sensitive
data on a wireless network. Do you have very sensitive data on your network, use cables instead!
Note, Channel 14 is a bit special because it basically only used in Japan, very few European products can use this channel and no American. Therefore we have to choose a channel not in use or has few as possible users.
When you buy a USB wireless card you often get some software to it to find and connect to wireless networks on a CD, these can often also be able to view the signal strength and channel of the networks in your vicinity when scanning for them. Windows built-in service to find networks does not report this. However, there is good freeware that can do this, for example inSSIDer that works well in Vista/Win7 and gives a very good overall picture of which channels are occupied. This program can be downloaded here: http://www.metageek.net/products/inssider

When we scanned our surroundings and have our little list of networks and channels they use, we see in the example above that there are a number of networks on channel 1, one on channel 6 and channel 11 is completely empty. Then we select the channel 11 where it right now are no other networks that may interfere with our own.
NOTE: If you for instance has three neighbors using channel 1, 6 and 11 respectively, you should not try to select a channel in the middle of them, but instead choose the same channel as any of them. Otherwise, your AP may happen to miss when another AP broadcasts as they are not on exactly the same channel and then you will get collisions if multiple AP's transmit simultaneously, which can result in very poor performance for both networks.
When you select WPA or WPA2, you will also get to choose which encryption algorithm to use, there is usually TKIP and AES to choose from. Here we choose AES, it is a very strong and safe security algorithm. TKIP in combination with WPA has some flaws and should be avoided.
However, unlike other passwords this ones can be written down and saved at your computer or on a note for easy display for guests to access your network, since someone who want to break into your network will probably never visit your home.
Selecting the Access Point
An access point is the device that holds up all the wireless network and any device that wants to be part of the network has to connect to it. I will not go into more detail on how to select an access point as there are hundreds of different models with different speeds and so on to chose from. Find out your requirements on your wireless network, required speed and range, etc. and post on a forum to quickly get help to find one to match your needs.Selection of the SSID
The first thing to choose is a good SSID, the name of your network. What you should keep in mind here is to not choose a default name, for example: "Default", "d-link", "linksys" and other standard names should be avoided because the SSID is involved in the process of generating the network key. Because of that, there are many precomputed encryption keys for those network names making them easy to crack. You should therefore think of a name that no one else can possibly use or at least not likely to appear among the top 1000 most common SSID that can be fond here.SSID Broadcast
This feature is available at most access points and controls if you want the network to be advertised, that it is visible when people search for nearby wireless networks. Many people like to turn this off to make the network 'invisible' to others. But this is really a false sense of security, it is very easy for someone looking to discover the network anyway, and above all, this is a great security risk to your own computer as it always will send out requests to check if the network is nearby, making it possible to set up fake networks that your computer will be fooled into connecting to, a so-called man-in-the-middle attack. There are also usually some devices malfunction when you attempt to connect them to a hidden network, making this feature a useless headache. Therefore it is highly recommended not to hide your SSID.Choice of Channel
Next, we choose a channel for your access point to communicate on. Access points are talk using radio frequencies (2.4 Ghz band and some even 5GHz band) and works a bit like com radios. As soon any device on the network broadcast, no other device located on the same channel can transmit simultaneously. This means that if you have a neighbor who also has a wireless network and you both have chosen to work on the same channel, then the entire network have to wait for the device on the other network finished talking before it can start sending even if you have two completely separate networks. This reduces performance on the net and it would be of course avoided. The 2.4 GHz band, which is the most common today, has a total of 14 channels to choose from, with only 3 of which do not overlap each other. These channels are 1, 6 and 11, their specific frequency can be seen here: |
| Source: Wikipedia |
Note, Channel 14 is a bit special because it basically only used in Japan, very few European products can use this channel and no American. Therefore we have to choose a channel not in use or has few as possible users.
When you buy a USB wireless card you often get some software to it to find and connect to wireless networks on a CD, these can often also be able to view the signal strength and channel of the networks in your vicinity when scanning for them. Windows built-in service to find networks does not report this. However, there is good freeware that can do this, for example inSSIDer that works well in Vista/Win7 and gives a very good overall picture of which channels are occupied. This program can be downloaded here: http://www.metageek.net/products/inssider
When we scanned our surroundings and have our little list of networks and channels they use, we see in the example above that there are a number of networks on channel 1, one on channel 6 and channel 11 is completely empty. Then we select the channel 11 where it right now are no other networks that may interfere with our own.
NOTE: If you for instance has three neighbors using channel 1, 6 and 11 respectively, you should not try to select a channel in the middle of them, but instead choose the same channel as any of them. Otherwise, your AP may happen to miss when another AP broadcasts as they are not on exactly the same channel and then you will get collisions if multiple AP's transmit simultaneously, which can result in very poor performance for both networks.
Choice of Encryption
A modern access point today can handle a bunch of different encryptions, the most common are WEP, WPA Personal (sometimes called WPA-PSK), WPA Enterprise, WPA2 Personal (sometimes referred to as WPA2-PSK) and WPA2 Enterprise.- WEP is an old, weak encryption that shall not be used under any circumstances, it is so weak that it is possible to get the key to the network in under 1 minute no matter what you chose to set the key to. For anyone who knows how to use google is a WEP encrypted network basically the same thing as a completely open network.
- WPA Personal is a much more secure encryption, but still contains some weaknesses. The reason for choosing this is if you have some devices in the network that do not support WPA2.
- WPA2 Personal is the best option to date, as long as all devices to be connected to the network supports it, you should use WPA2.
- WPA/WPA2 Enterprise is a server-based option intended for companies with a lot of users and not something you need for your home network.
When you select WPA or WPA2, you will also get to choose which encryption algorithm to use, there is usually TKIP and AES to choose from. Here we choose AES, it is a very strong and safe security algorithm. TKIP in combination with WPA has some flaws and should be avoided.
Selecting the Network Key
When selecting your key or password to your network the same rules as setting passwords to anything you want to stay safe applies, use mixed numbers, letters and special characters. A WPA/WPA2 key must be at least 8 characters long, I would recommend 10 characters or more. Then not even a computer farm model large can crack the key within a reasonable time. The only effective attack against this network would be dictionaries, so I would again emphasize that you should not use any words, even modified by numbers, as many cracking tools will try and replace the letters in the words with numbers. Completely random character is the only thing that is completely safe.However, unlike other passwords this ones can be written down and saved at your computer or on a note for easy display for guests to access your network, since someone who want to break into your network will probably never visit your home.
Miscellaneous security
Now we have a relatively secure wireless network that will withstand most attacks. However, there are some other small features for additional security that might be good to use.
Password to Access Point
Something you can not forget is to change the password to manage to the access point. Be sure to choose a secure password here too.
MAC-lock
Each network card has its own unique MAC address used when they are communicating. Most access points today can choose to lock so that only certain MAC addresses are allowed on the network. This is also a false sense of security. This feature was originally designed for wired networks where you can not see any traffic before you are connected network device and thus do not know what MAC addresses are allowed. This feature has simply been ported to wireless devices without thinking it through. Since wireless devices send out any data over the radio to anyone who will listen, it is a very simple thing to simply listen in the air and see which MAC addresses using the network, then just change your own MAC address to one of these and surf freely. It is also frustrating to have to manually add the address of your friend's mobile phone or laptop to get access to the web. The whole function just means more job for you and provides no security at all.
WPS
WPS, which stands for WiFi Protected Setup is a feature that was added on most home routers in 2008 and will allow users to set up their wireless networks easily. Unfortunately, almost all implementations of the function is very poor and is a major security vulnerability. The PIN that you use to control the router is fairly easy to bruteforce. Once we got the PIN for WPS can then just ask the AP the network name and password which it uses, which means that all other security fails. So make sure to turn off this feature if possible. Unfortunately, there are actually some routers (eg Linksys) where the vulnerability is still there even when you chose to turn the feature off in the web interface.
ACK Timing
This feature is rarely found on access points, but would you find it, it is a little handy. It allows you to set how far away from the access point you may be and check it by measuring the time it takes for some packages to get to the access point and back. This prevents people from using powerful directional antennas to access your network from far away.
Subscribe to:
Posts (Atom)